Setting Up Online Scheduling
Ready for your patients to schedule their appointments online? First, make sure you've set up your practice and provider schedules in Eaglesoft by following the instructions in Prepping Eaglesoft for Yapi Leap's Online Scheduling. Then, follow the steps in the sections below to set up Online Scheduling in Yapi Leap. Unless we mention something's optional, make sure you complete all the steps in each section.
Caution
We STRONGLY recommend doing your entire Online Scheduling setup in one sitting. It's okay if you get pulled away (that happens, right?) but we want to make sure you don't miss a step.
Note
Online Scheduling isn't available on all Yapi Leap plans  . If you'd like to add it, contact your Client Success Manager and they'll get you started!
To access the setup for Online Scheduling:
Important
Only Admins can access this setup. If you don't see a Practice Settings option, you can ask another Admin at your practice to complete the setup or to change your user role from User to Admin.
In the left-hand menu, click Settings and select Practice Settings.
Click Online Scheduling.
To set up the operatories used for online-scheduled appointments:
In the Appointments tab (which shows by default), click Operatories.
For each operatory you want available for online-scheduled appointments, slide its toggle to the right (orange).
Tip
If you just added an operatory in Eaglesoft or you don't see the correct operatories from Eaglesoft listed on the page, click the Refresh button.

Click Save Operatories.
At the top of the page, click Go Back to Online Scheduling.
To set up the treatments patients can schedule online:
In the Appointments tab, click Treatment Details.
Click Add Treatment.
For each treatment:
Treatment Name - Type in a name for the treatment. (This is the name your patients will see.)
Appointment Type - Select the type of appointment this is.
Under Patient Type, select whether you want this treatment available to New Patients and/or Existing (non-recall) Patients, or just Recall Patients.
Tip
Want this treatment available for Recall and other types of patients? Just create a separate Treatment, starting with Step 2 above.
If you selected...
New Patients:
Procedure Code - Type in the procedure code for the treatment or click Select Code to search and select it from a list.
Duration - Choose the length of time needed for this treatment (recommended) or choose Let System Calculate if you've already set times for your treatments in Eaglesoft (this is not common).
Existing Patients:
Is covered by insurance - Select this box if the treatment is covered by insurance.
Procedure Code - Type in the procedure code for the treatment or click Select Code to search and select it from a list.
Duration - Choose the length of time needed for this treatment (recommended) or choose Let System Calculate if you've already set times for your treatments in Eaglesoft (this is not common).
Recall Patients: Select the boxes for Adult Recall, Child Recall, or both depending on what you want to offer for online scheduling. Then, for each one you selected:
Recall Name - Select the recall type for this treatment (usually Next Recall) from the list.
Procedure Code - Type in the procedure code for the treatment or click Select Code to search and select it from a list.
Duration - Choose the length of time needed for this treatment (recommended) or choose Let System Calculate if you've already set times for your treatments in Eaglesoft (this is not common).
Add Exam? - Select this if you want an exam added to the appointment. Then enter the Procedure Code for an exam by typing it in or clicking Search Code to select it. Under Add When, choose whether you want an exam added Always or just for the First visit of the year.
Add Bitewings (if due)? - Select this if you want bitewings added to the appointment if a patient is due for them. Then select the recall type for this treatment from the list (usually 2BW or 4BW) and enter the Procedure Code by typing it in or clicking Search Code to select it.
Add FMX (if due)? (not available for Child Recall) - Select this if you want a full mouth series of x-rays added to the appointment if a patient is due for them. Then select the recall type for this treatment from the list (usually FMX) and enter the Procedure Code by typing it in or clicking Search Code to select it.
Click Save Treatment.
Repeat Steps 2 - 5 for each treatment you want to offer for online scheduling.
At the top of the page, click Go Back to Treatments.
Next, select the insurance providers your practice accepts for online-scheduled appointments:
Note
Just remember what you set on this screen determines how Yapi Leap prompts the patient as they're in the process of scheduling an appointment.
In the Appointments tab, click Accepted Insurance.
Click Select from List.
Scroll and select the boxes for each insurance provider your practice accepts. Then click Save.
For each insurance, click on its row. Then select:
Type (Optional) - If this is a popular insurance and/or a government-issued insurance, select the appropriate box(es). Popular insurance shows at the top of the list when a patient sees the list of insurances you accept.
Accepted Type - Check the boxes for the types of this insurance you accept (HMO, DHMO, EPO, and/or PPO). If you choose PPO, also select whether you accept it In Network or Out of Network.
Click Save.
For each insurance, slide its toggle to the right (orange) to make it active.
If you didn't see an insurance provider on the list, you can add it manually (otherwise skip this step). Click Add Manually and enter:
Insurance Name - Type in the name of the insurance provider.
Type (Optional) - If this is a popular insurance and/or a government-issued insurance, select the appropriate box(es). Popular insurance shows at the top of the list when a patient sees the list of insurances you accept.
Accepted Type - Check the boxes for the types of this insurance you accept (HMO, DHMO, EPO, and/or PPO). If you choose PPO, also select whether you accept it In Network or Out of Network.
Click Save.
At the top of the page, click Go Back to Online Scheduling.
To set up each of the providers that offer appointments for online scheduling:
Important
You'll need to repeat all these steps for each provider at your practice!
Bio Tab
Select the Providers tab.
Click on a provider in your list. This opens their Provider Profile.
In the Bio tab (which shows by default), enter:
Provider Online Scheduling Name - Enter the name you want patients to see when choosing a provider for their appointment.
Tip
We recommend adding the provider's title like "Doctor" or "Hygienist" to distinguish between providers. For pediatrics, it's also a great chance to provide kid-friendly names like "Doctor Amy."
And if your practice is one of those offices that have set up a generic provider in Eaglesoft because you don't want patients booking appointments with a specific provider, make sure you use a patient friendly name (such as Any Dentist or Any Hygienist).
A short bio telling patients a little about the provider. For example you can include information about when the provider graduated, any languages they speak, and any other information you think new patients may want to know before scheduling an appointment.
Tip
If your office is using only a generic provider (Any Dentist or Any Hygienist), you can use the bio to enter a short description about how you'll pair the patient with a provider that best matches the patient's availability and the procedure they're coming in for.
Click Save Bio.
Scheduling Rules Tab
In the Provider Profile, click the Scheduling Rules tab. You'll see all the treatments you configured in Treatment Details.
For each treatment that this provider offers:
Click the down arrow
 on the treatment to toggle open its scheduling rules.
Operatory - Select the operatories the provider offers this treatment in.
Availability - Toggle Always Available to the right (orange) to use the provider's availability from Eaglesoft (recommended). To manually set specific days and times, toggle Always Available to the left (grey). Then select the days and times the provider is available for the treatment.
Click Save.
Click the up arrow
 to close the treatment's rules. Then slide the treatment's toggle to the right (orange) to enable it.
Repeat step 2 for each treatment this provider offers.
Settings Tab
In the Provider Profile, click the Settings tab.
Booking Capacity - Select Single Booking if this provider can only take one appointment at a time. Select Double-Booking if they can take two appointments at a time or Multi-Booking if they can take as many appointments as they have operatories available.
Tip
If you're using a generic provider as previously above, (Any Dentist or Any Hygienist), make sure to set the provider's booking capacity to Multi-Booking.
Treat Patients Ranging From - Enter the minimum and maximum age for patients this provider sees.
Click Save Settings.
At the top of the page, click Go Back to Online Scheduling.
Enabling the Provider
Locate the provider within the list.
At the end of their row, toggle the slider to the right (orange) to make this provider available for online scheduling. A confirmation message will display at the bottom of your screen, confirming your update was saved.
To finish your Online Scheduling setup, you just have a few more settings. First:
Select the General Settings tab.
Next to General Settings, slide the toggle to the right (orange). This opens up your General Settings and enables Online Scheduling, but only once you click Save at the bottom of the page.
Continue on to the other settings in this section below, starting with Online Scheduling Options (skip the Scheduling Link section for now).
Online Scheduling Options
Online Scheduling Options includes settings for emergency appointments, block scheduling, and the upper age limit for pediatric-level recall appointments:
Same day Online Scheduling for Emergency Treatment - Slide the toggle to the right (orange) if you want patients to be able to schedule same-day appointments for emergencies (any treatments with the word "Emergency" in the name).
Block Scheduling - Slide the toggle to the right (orange) if your practice uses OnSchedule Templates in Eaglesoft. (Otherwise, skip this step.) Then select either Strict or Flexible based on how your practice wants appointments scheduled for the your practice's time blocks.
If you're unfamiliar with OnSchedule Templates or need to review your settings in Eaglesoft first, refer Review OnSchedule Templates (Optional).
Strict (default) - For any treatments that have a corresponding time block in Eaglesoft, Yapi Leap will only offer appointment times during that treatment type’s specified time blocks and no other types of appointments can be scheduled during these blocks.
Tip
For example, if you have a Prophy blockout set for all operatories from 9-11AM and an Emergencies blockout set for 3:30 - 5PM, patients can only schedule a Prophy between 9 and 11am or an Emergency between 3:30 and 5PM. They can’t schedule Prophies or Emergencies outside of these times and no other types of appointment types can be scheduled during Prophy and Emergency blockout times.
Flexible - For any treatments that have a corresponding time block in Eaglesoft, Yapi Leap will only offer appointment times during that treatment type’s specified time blocks AND any type of appointment without a corresponding blockout can also be scheduled during these blocks.
Tip
For example, if you have a Prophy blockout set for all operatories from 9-11AM and an Emergencies blockout set for 3:30 - 5PM, patients can only schedule a Prophy between 9 and 11am and can only schedule an Emergency between 3:30 and 5PM. But other types of appointments (like, say, a Consult or a Root Canal) can also be scheduled during those blocks or any other available time on your schedule.
Automated Appointment Booking Staff - Select a staff member from the dropdown menu. When a patient books an appointment online, this will show as the staff member who booked the appointment.
Child Age Limit (required) - Type in the highest age your practice considers a patient to be a child (often 16 or 17). This helps Yapi Leap determine what recall treatments a patient can book based on their birthdate.
Insurance Options
Insurance Options controls what insurance information new patients are asked for when booking online.
If you:
DO want to collect patients' insurance information: Move the Collect Insurance Information toggle to the right (orange). Then, go to the next step.
DON'T want to collect patients' insurance information: Move the Collect Insurance Information toggle to the left (grey) and skip to the Patient Type section below.
Select one:
Require manually entered insurance details - New patients must type in their insurance information.
Require patients to upload photo of insurance card - New patients must take a picture of their insurance card and upload it.
Require BOTH manual entry of insurance details AND upload a photo of insurance card
For Allow HMO Insurance for Online Scheduling, slide the toggle to the right (orange) if you want new patients with an HMO to be able to schedule online. Otherwise, they'll be asked to call you to schedule.
For Allow any PPO Insurance for Online Scheduling, slide the toggle to the right (orange) if you want to allow patients with a PPO that's not on your Accepted Insurances list to schedule online.
Patient Type
For Patient Type, you'll select which types of patients - New, Existing, or Recall patients - you'll let schedule appointments online. Then for each one, you'll configure some additional settings:
Allow New Patients to Schedule Online - Slide the toggle to the right (orange) if you want new patients to be able to schedule online.
Adult Form Package Link and Child Form Package Link - Leave these blank.
Display CAPTCHA Test - Slide the toggle to the right (orange) if you want to require new patients to complete a CAPTCHA. This adds security and keeps bots and spammers from booking online.
Email Address verifications - Slide the toggle to the right (orange) if you want Yapi Leap to verify that the email address a patient entered is real. This adds security and ensures you'll have the right information if you need to contact the patient.
Schedule Ahead Window - Enter the number of days ahead of time (minimum and maximum) that a new patient can schedule an appointment.
Tip
If you want patients to be able to schedule same-day appointments, set the minimum to "0". This allows patients to schedule up to an hour in advance of an available appointment.
Allow Existing Patients to Schedule Online - Slide the toggle to the right (orange) if you want existing patients to be able to schedule online.
Schedule Ahead Window - Enter the number of days ahead of time (minimum and maximum) that an existing patient can schedule an appointment.
Allow Recall Patients to Schedule Online - Slide the toggle to the right (orange) if you want recall patients to be able to book the recall appointment(s) they're due for online.
Schedule Ahead Window - Enter the number of days ahead of time (minimum and maximum) that a recall patient can schedule their recall appointment.
Click Save General Settings at the bottom of the page.
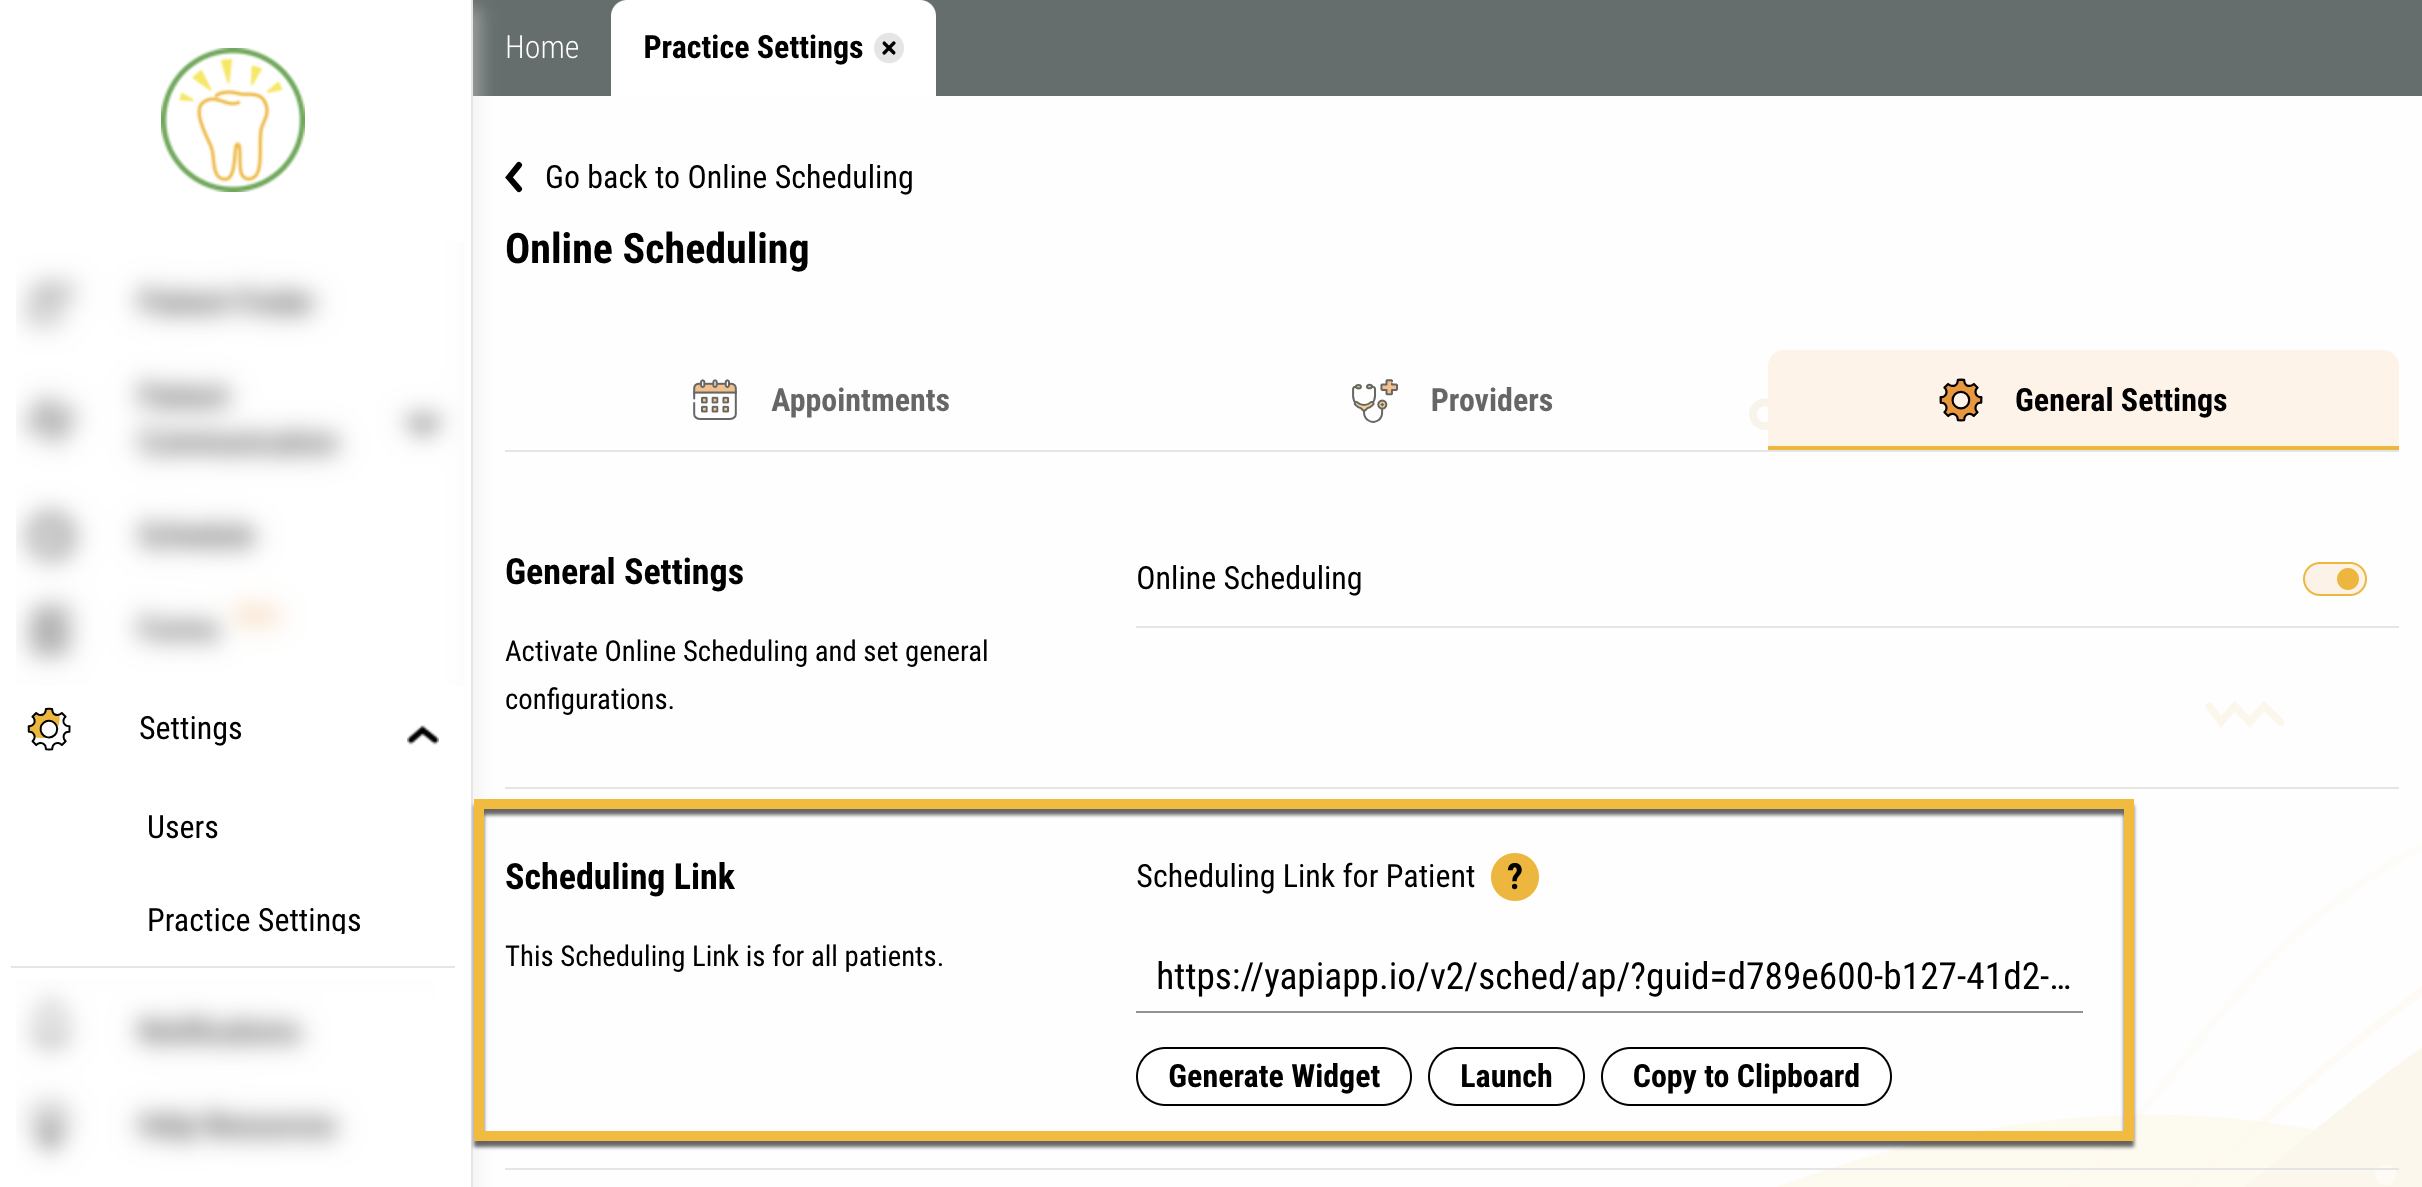
Scheduling Link (Optional)
The Scheduling Link section shows the unique link to your practice's scheduling page, which you can preview, copy, or add to your practice website in the form of a widget. You can also add it to your Google My Business page, Yelp, or social media to make it even easier for patients to book online.
This section doesn't require any setup within Leap, but you may want to use the Generate Widget or Copy to Clipboard options to grab the widget code and scheduling site link for your web developer.
Important
This link won't show until you've set everything else up and clicked Save General Settings at the bottom of the page.
Generate Widget - This opens a window with javascript that you can give to your web developer. They can then use this to add Yapi Leap's scheduling widget to your practice website. Just click Copy Script and paste the script into an email to your web developer.
Launch - Opens your practice's scheduling page in another browser tab so you can preview what patients see when scheduling.
Copy to Clipboard - Copies your scheduling page link so you can paste it into an email template or add it as a link on your practice website.
Tip
Want to add your scheduling link to your Google Business Profile so patients can schedule from there? Just follow the steps in Google's Local business links help page !
Once you've finished all the setup above, it's time to take your Online Scheduling for a test drive and make sure it's working:
Testing Your Settings
While you're still in the General Settings tab, find the Scheduling Link section and click Launch. This opens your scheduling page in a new browser tab so you can test it out!
If you enabled scheduling for new patients, try making an appointment for a new patient.
Follow the steps on the page to schedule an appointment for a new test patient. If you're able to schedule, you'll come to a You're All Set! message that includes the details of the appointment.
The appointment should show up within a few minutes on your Eaglesoft schedule.
If you come across an error or aren't able to schedule the appointment, double-check the steps of your setup.
If you enabled scheduling for existing patients, try making an appointment for an existing test patient using the email address, birthdate, and ZIP code you have for them in Eaglesoft .
Follow the steps on the page to schedule an appointment for a test patient you already have in Eaglesoft. Make sure your test patient has an email you can access: Yapi Leap will use it to verify that it's an existing patient in Eaglesoft.
If you're able to schedule, you'll come to a You're All Set! message that includes the details of the appointment.
The appointment should show up within a few minutes on your Eaglesoft schedule.
If you come across an error or aren't able to schedule the appointment, double-check the steps of your setup.
Changing Settings in the Future
Important
If your provider's schedules, operatory availability, or the treatments you offer change down the road, ALWAYS MAKE YOUR CHANGES IN Eaglesoft FIRST. Then, check your setup in Yapi Leap to see if there's anything else you need to update. (Most of the time, there isn't.)
If you need help with the stuff you need to change in Eaglesoft - like a provider's scheduled vacation or change in hours - check out: