
YAPI Help Center

Forms Library

Yapi Leap's Forms Library lets you to view and manage the paperless forms and packages that your practice can offer to patients. Here you can:

Forms Library Overview

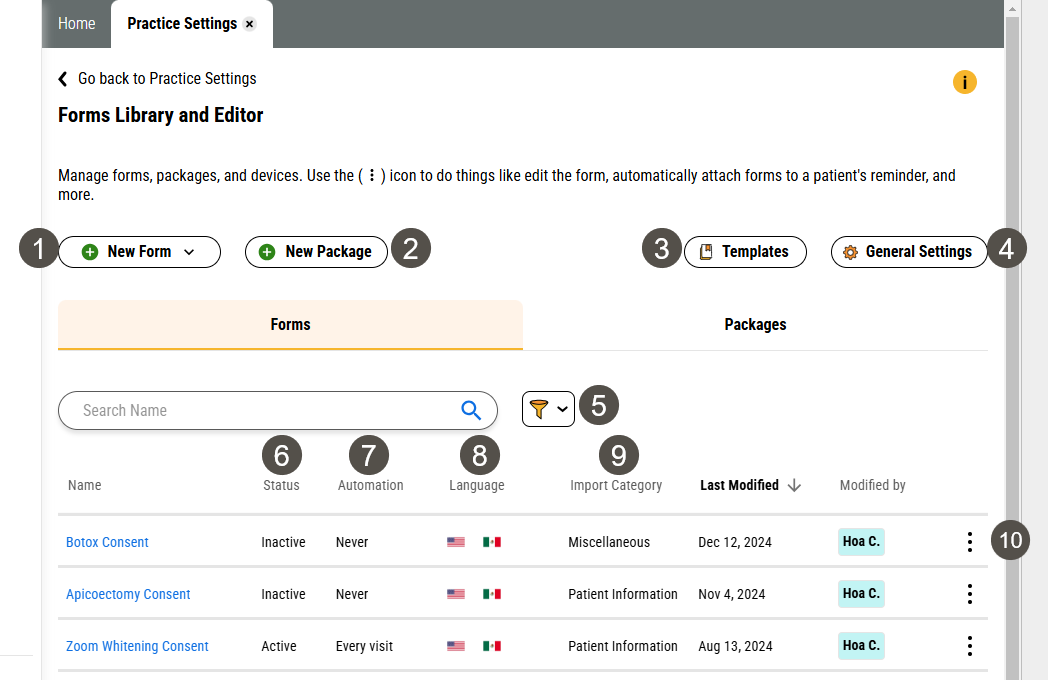
Parts of the Forms Library Page in Leap

To get to the Forms Library page, click Settings > Practice Settings > Forms Library and Editor.

Important

Only users with Admin privileges can access this page.

The Forms tab displays by default when you click Settings > Practice Settings > Forms Library and Editor.

Forms Library and Editor page with several items numbered, described in the table.

One.

New Form Button

Opens a menu where you can select:

  • Create from scratch - Opens the Form Editor where you can create your own custom paperless form.

  • Import Form - Lets you import a form that's been downloaded from Leap. This can be useful if your practice multiple locations and you've got a location that's using a form that can be shared with the other location(s).

  • Browse Pre-Made Templates - This takes you to the Forms tab of the Templates page, where you can export a pre-made form or send it to your Forms Library. You can also navigate to the same page by clicking the Templates button.

Two.

New Package Button

Opens a pop-up to create a new package of forms (like new patient forms or a package of consent forms your team always gives to patients together). Your team can then easily assign this package to patients instead of having to select each individual form.

Three.

Templates Button

Opens the Forms tab of the Templates page, where you can export a pre-made form or send it to your Forms Library. This is a great way to expand your library of forms or simply grab a clean copy of a form you've edited if you want to start over.

Four.

General Settings Button

Opens the Settings page where you can manage the in-office devices your practice has available for patients to complete their forms on (like tablets and kiosks) and set Automatic Filing for Pending Forms.

Five.

Filter

Filter your list of forms by language, category, or form status (active or inactive).

Six.

Status

Active - The form is available for use and can be sent to patients as needed.

Inactive - The form is in your library but you can't give it to a patient. (It won't be displayed in the list when you're assigning forms.) This allows you to keep a form if you think you might use it later but don't want your team assigning it to patients.

Seven.

Automation

Shows whether automation has been set up for the form.

Eight.

Language

Displays the flag for the language that this form is available in. Yapi Leap currently supports three languages: English English language icon., Spanish Spanish language icon., and German German language icon.. To learn more about preparing forms for multi-lingual patients, click here.

Nine.

Import Category

This shows which folder the completed form will be imported to in Eaglesoft when a patient completes it. This category is selected for each form when you create it (or for form templates when you follow the steps in Sending a Leap Template to Your Forms Library) but you can change it in the Form Editor.

Ten.

3-Dot Icon

The 3-dot icon provides options for managing each form. Options you'll see are:

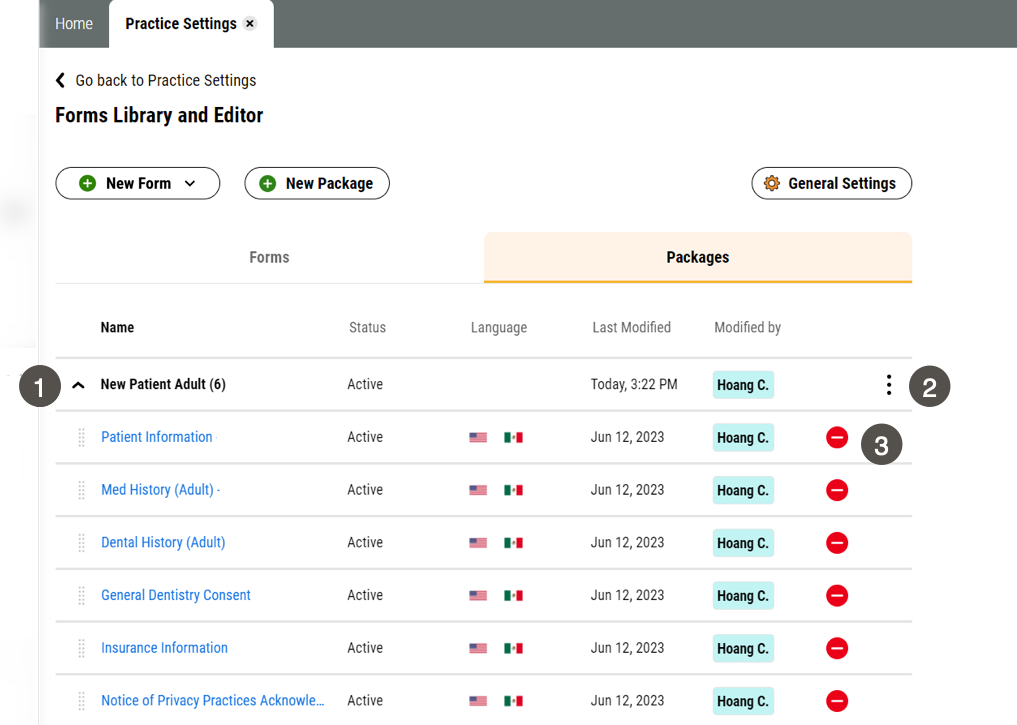
To get to the Forms Library tab, click Settings > Practice Settings > Forms Library and Editor > Packages.

FormsLibrary-PackagesTab.png

One.

Arrow

Expands a package to show which forms are contained in it.

Two.

3-Dot Icon

Click the 3-dot icon to manage a package by selecting from the following options:

Three.

Delete Icon

This icon shows next to each form when you click the Down Arrow to view a package's contents. Clicking the Delete icon next to a form removes it from the package. (Don't worry, it doesn't delete the form itself.)