YAPI Help Center

Patient Profile

In Yapi Leap, each patient has a Profile page, organized into tabs. Here, you can:

Note

To learn more about what information Leap pulls from Dentrix, check out How Patient Profiles Integrate with Dentrix.

Parts of the Patient Profile Page in Leap

To get to a patient's Profile page, search for them in the Patient Finder and click their name in your search results.

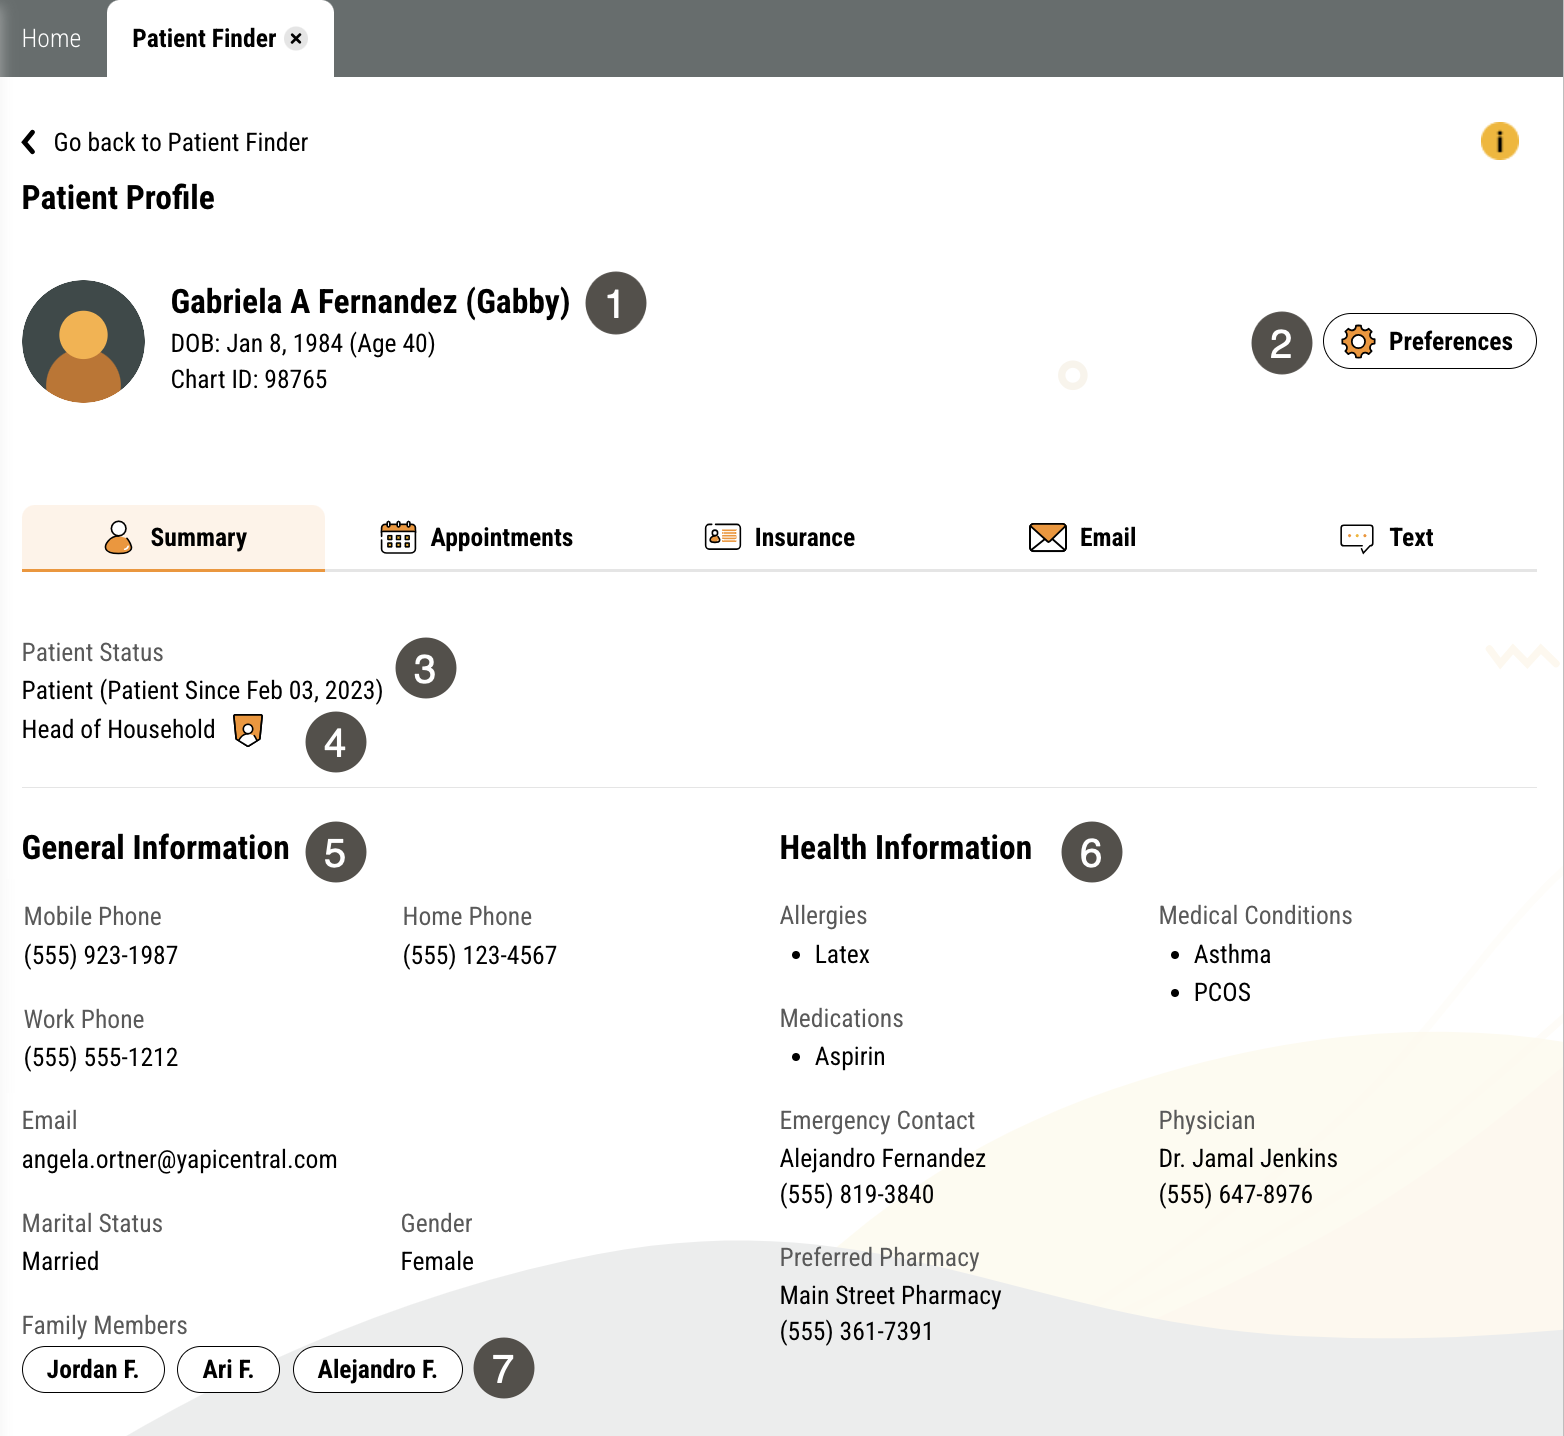
To get to the Summary tab of a patient's Profile, search for them in the Patient Finder and click their name in your search results. The Summary tab shows by default.

Patient Profile page showing Summary tab with several items numbered, described in the table to the right.

One.

Patient Name, Date of Birth, and Chart Number

Shows a patient's first name, middle initial, and last name, middle initial, preferred name in parentheses.

  • Full name with middle initial

  • Preferred name in parentheses

  • Date of birth and age

  • Chart/Patient ID from Dentrix

Two.

Preferences

Click this button to view and edit a patient's scheduling and communication preferences.

Three.

Patient Status

Shows the patient's status and how long they've been a patient.

Four.

Head of Household

If a patient is their Head of Household, that's indicated here. If they're Head of Household, this line is left blank.

Five.

General Information

This section shows a patient's basic demographic information including the phone numbers and email address you have on file for them in Dentrix.

Six.

Health Information

This section shows a patient's health details from Dentrix including:

  • Medical Conditions

  • Allergies

  • Medications

  • Emergency Contact

  • Physician

  • Preferred Pharmacy

How health information displays may look slightly different from the image above, depending on the version of Dentrix your office is using.

Seven.

Family Members

If a patient has family members that also visit to your practice, they'll be listed here. And you can click any family member's name to view their Profile.

To get to the Appointments tab of a patient's Profile, search for them in the Patient Finder, click their name in your search results, and click Appointments.

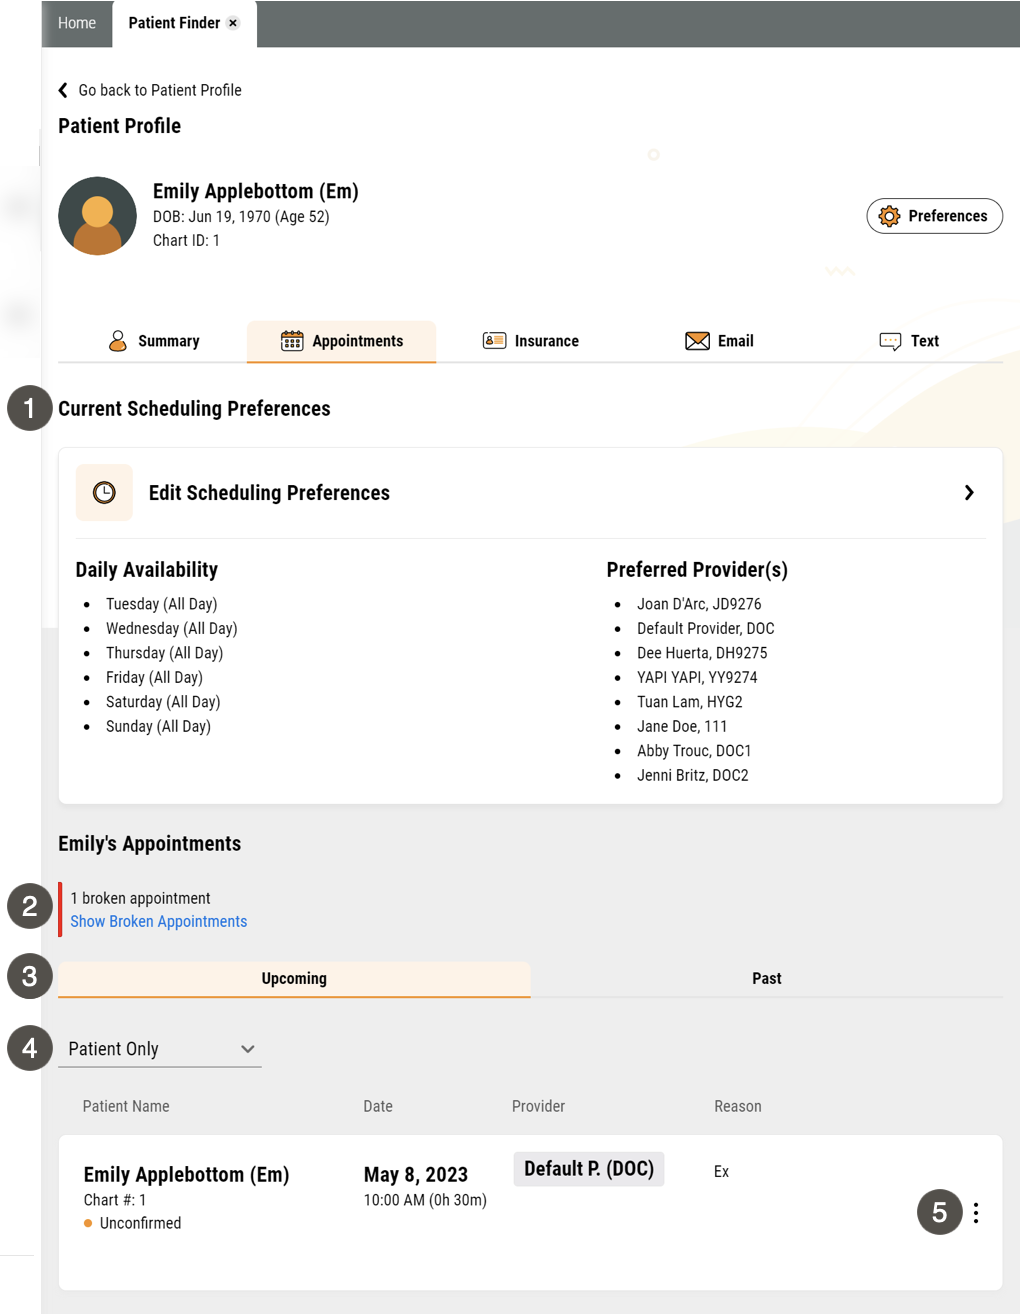
Patient Profile page showing Appointments tab with several items numbered, described in the table to the right.

One.

Current Scheduling Preferences

This section shows the patient's current scheduling preferences. Click the right-facing arrow next to Edit Scheduling Preferences to make changes.

Two.

Broken Appointments

This section shows how many past appointments a patient has broken. Click the Show Broken Appointments link to see details. For more about Broken Appointments in Leap, see our note below this table.

If a patient has never broken an appointment, this section won't appear on their Profile.

Three.

Upcoming and Past Appointment Tabs

This section shows all the patient's appointments, divided into Upcoming and Past tabs. In either tab, you can click on any appointment to view appointment details.

Four.

Patient Only/Family Filter

Defaulting to Patient Only, this filter lets you switch from viewing only the patient's appointments to viewing the appointments for all members of their family that visit your practice.

Five.

3-Dot Icon

Click here to select Go to Patient Profile, which takes you back to the Summary tab of the patient's Profile.

Note

Broken Appointments: Leap considers an appointment broken if it's marked as broken in Dentrix. If a patient rescheduled their appointment or someone at your office deleted an appointment from the schedule, these aren’t counted as broken appointments.

To get to the Insurance tab of a patient's Profile, search for them in the Patient Finder, click their name in your search results, and click Insurance.

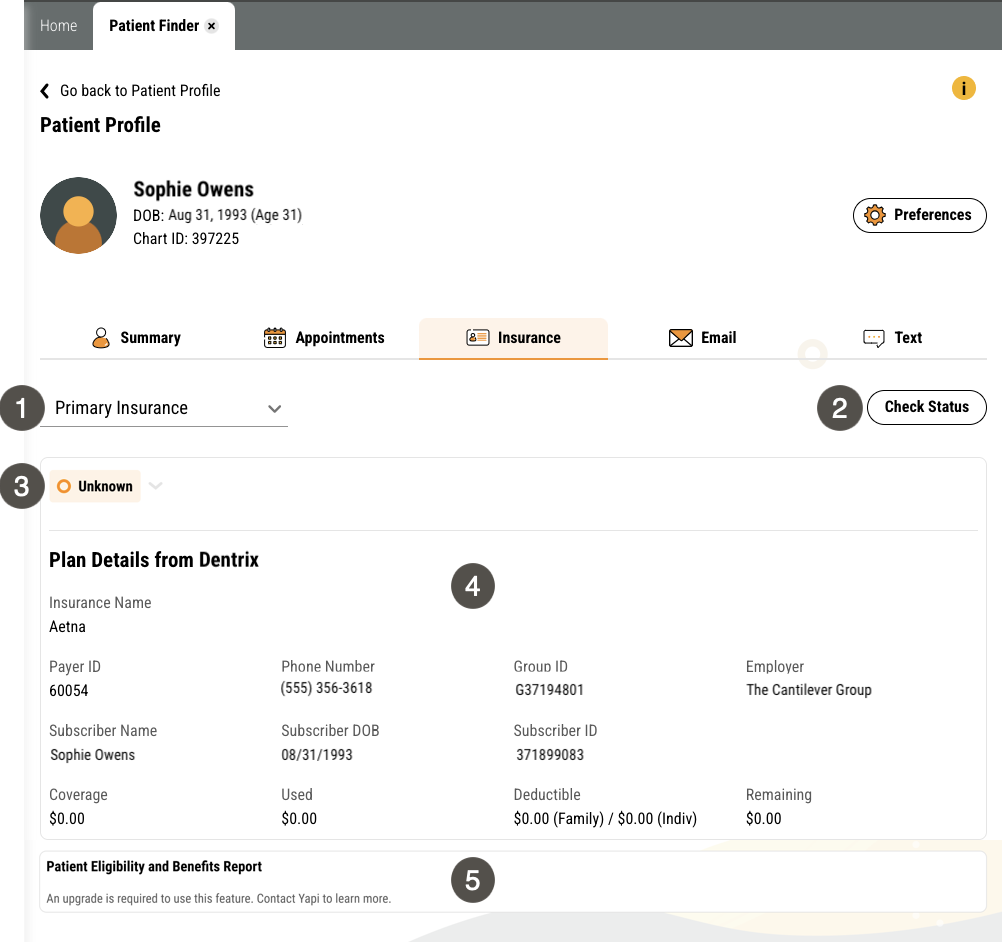
Insurance tab of a patient's Patient Profile page with several items numbered, described in the table to the right.

One.

Primary/Secondary Insurance Selection

Click the dropdown arrow Down arrow icon. to view another insurance for the patient in the Plan Details area, if they have more than one insurance on file in Dentrix. The patient's Primary Insurance always shows by default.

Two.

Check Status Button

This button is used for Insurance Verification. If you don't have Insurance Verification on your Yapi plan, this button is greyed out.

Three.

Insurance Eligibility Status

This status is an added feature of Insurance Verification. If you don't have Insurance Verification on your Yapi plan, this status will always show as "Unknown.

Four.

Plan Details from Dentrix

This area shows a patient's basic information as it's entered in Dentrix, including:

  • Insurance Name, Phone, and Payer ID

  • Subscriber ID and Group ID

  • Subscriber Name and Date of Birth

  • Employer

  • Covered, Deductible, Amount Used, and Amount Remaining

Five.

Patient Eligibility and Benefits Report

This section is an added feature of Insurance Verification. If you don't have Insurance Verification on your Yapi plan, this area will be blank.

Important

This view of the Insurance tab only displays if you have Insurance Verification on your Yapi plan.

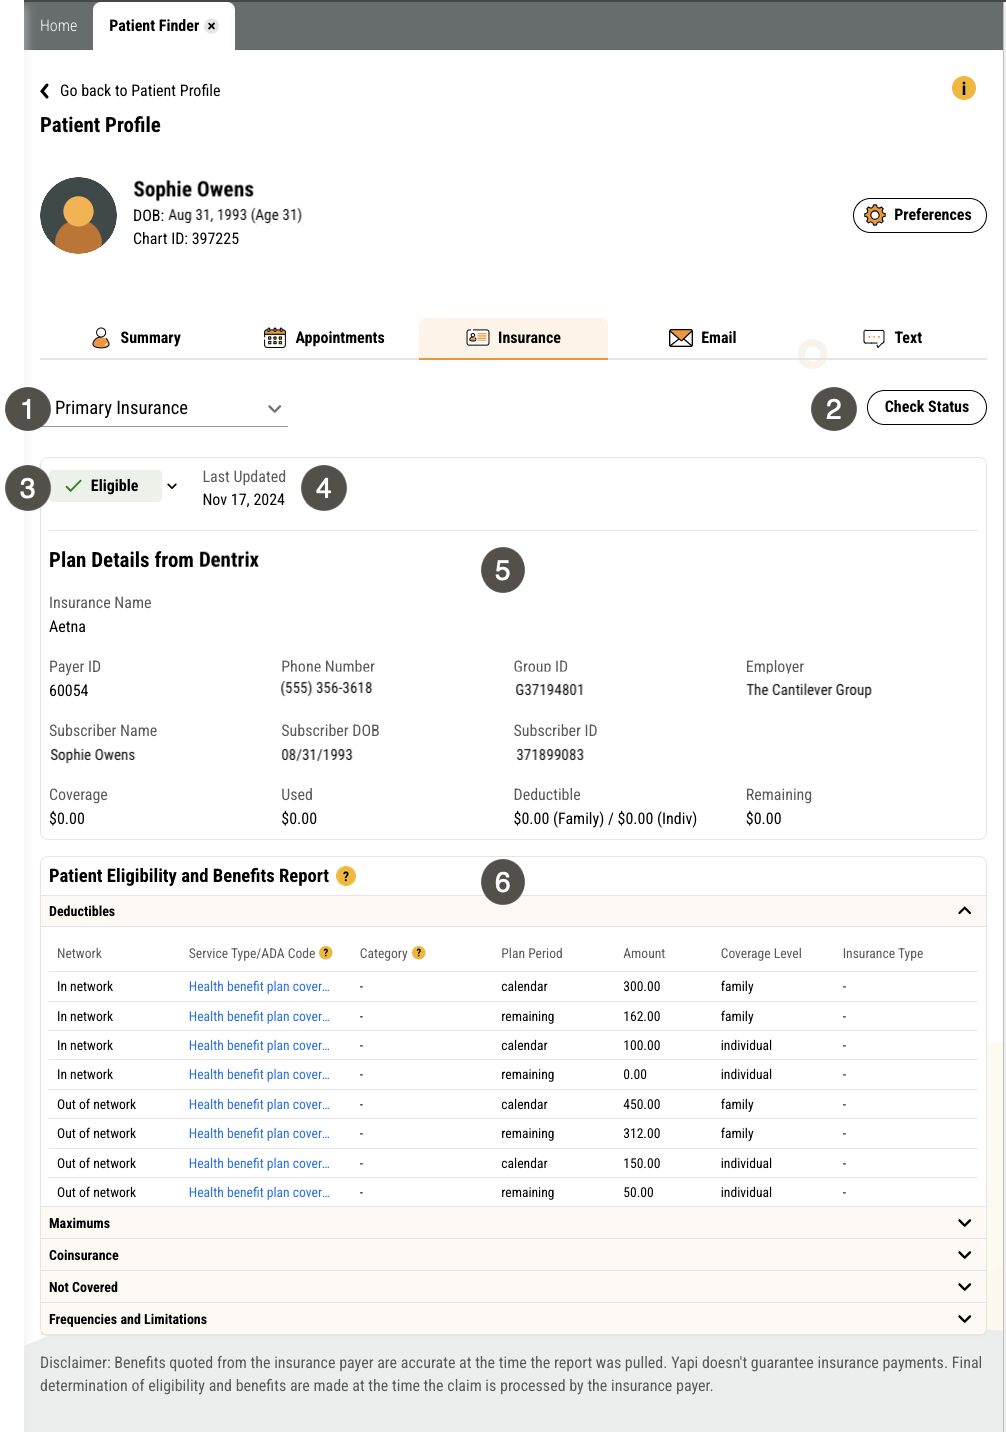
Insurance tab of a patient's Patient Profile page with several items numbered, described in the table to the right.

One.

Primary/Secondary Insurance Selection

Click the dropdown arrow Down arrow icon. to view another insurance for the patient in the Plan Details area, if they have more than one insurance on file in Dentrix. The patient's Primary Insurance always shows by default.

Two.

Check Status Button

Click this button to check a patient's eligibility for the selected insurance.

Three.

Insurance Eligibility Status

Displays a patient's eligibility for the selected insurance:

  • Eligible - This patient's insurance eligibility has been verified.

  • Not Eligible - This patient is not eligible with the insurance on file. Contact the patient to see if they have updated insurance information.

  • Not Checked - This patient's insurance eligibility hasn't been checked yet. Click the Check Status button to check it. Or if you have automation set up, Leap will automatically check for you on the interval you've chosen in your Insurance Verification settings.

  • Unknown - Insurance unknown. Leap can't check insurance eligibility for this plan because it isn't one of the payers we check eligibility for. Contact the insurance company directly to check eligibility.

  • Error - There was an error in checking insurance eligibility.

Four.

Last Updated Date

The last date that the patient's insurance eligibility status was checked.

Five.

Plan Details from DentrixItem

This area shows a patient's basic information as it's entered in Dentrix, including:

  • Insurance Name, Phone, and Payer ID

  • Subscriber ID and Group ID

  • Subscriber Name and Date of Birth

  • Employer

  • Covered, Deductible, Amount Used, and Amount Remaining

Six.

Patient Eligibility and Benefits Report

This report shows a patient's deductibles, maximums, coinsurance, frequencies and limitations of what's covered, and what's not covered in their plan.

Leap shows this information as it is given to us by the insurance provider. You can check what level of detail is available for each payer on our List of Insurance Providers.

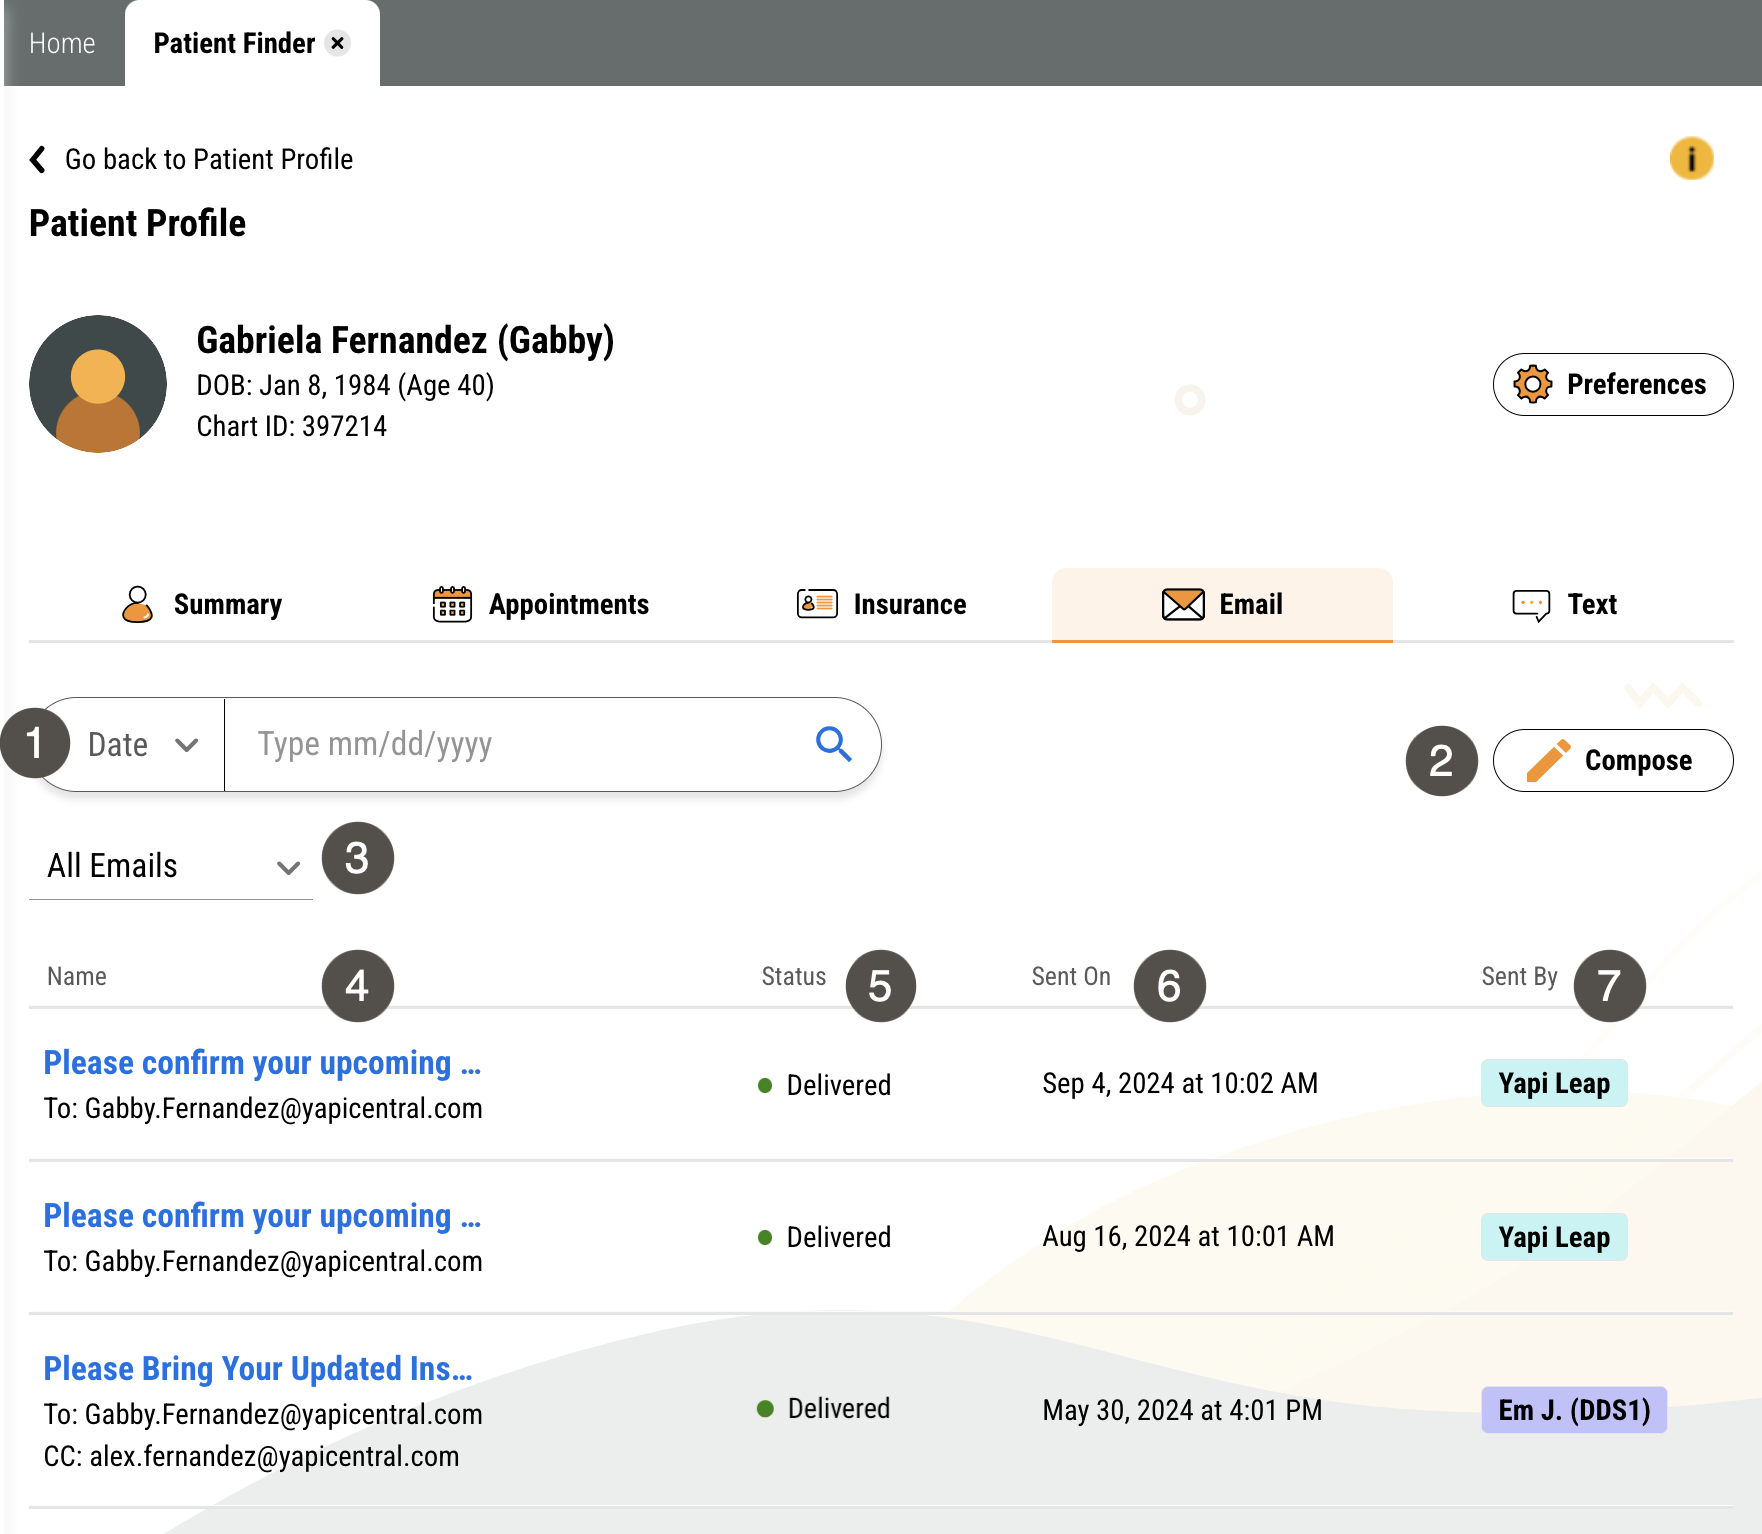
To get to the Email tab of a patient's Profile, search for them in the Patient Finder, click their name in your search results, and click Email.

Patient Profile page showing Email tab with several items labelled, described in the table to the right.

One.

Search Box

Search the last 12 months of your practice's emails to a patient through Leap by Date or Subject.

Two.

Compose Button

Click here to compose an email to your patient.

Three.

Name

Lists the Subject of each email sent to a patient from Leap within the last 12 months along with the email address(es) it was sent to. Emails listed here include:

Four.

Status

Displays the status of an email sent from Leap:

  • Sent

  • Delivered

  • Opened

  • Bounced

Five.

Sent On

Lists the day and date each email was sent.

Six.

Sent By

Displays which team member sent an email. Automated emails (like reminders) are listed as being sent by Yapi Leap.

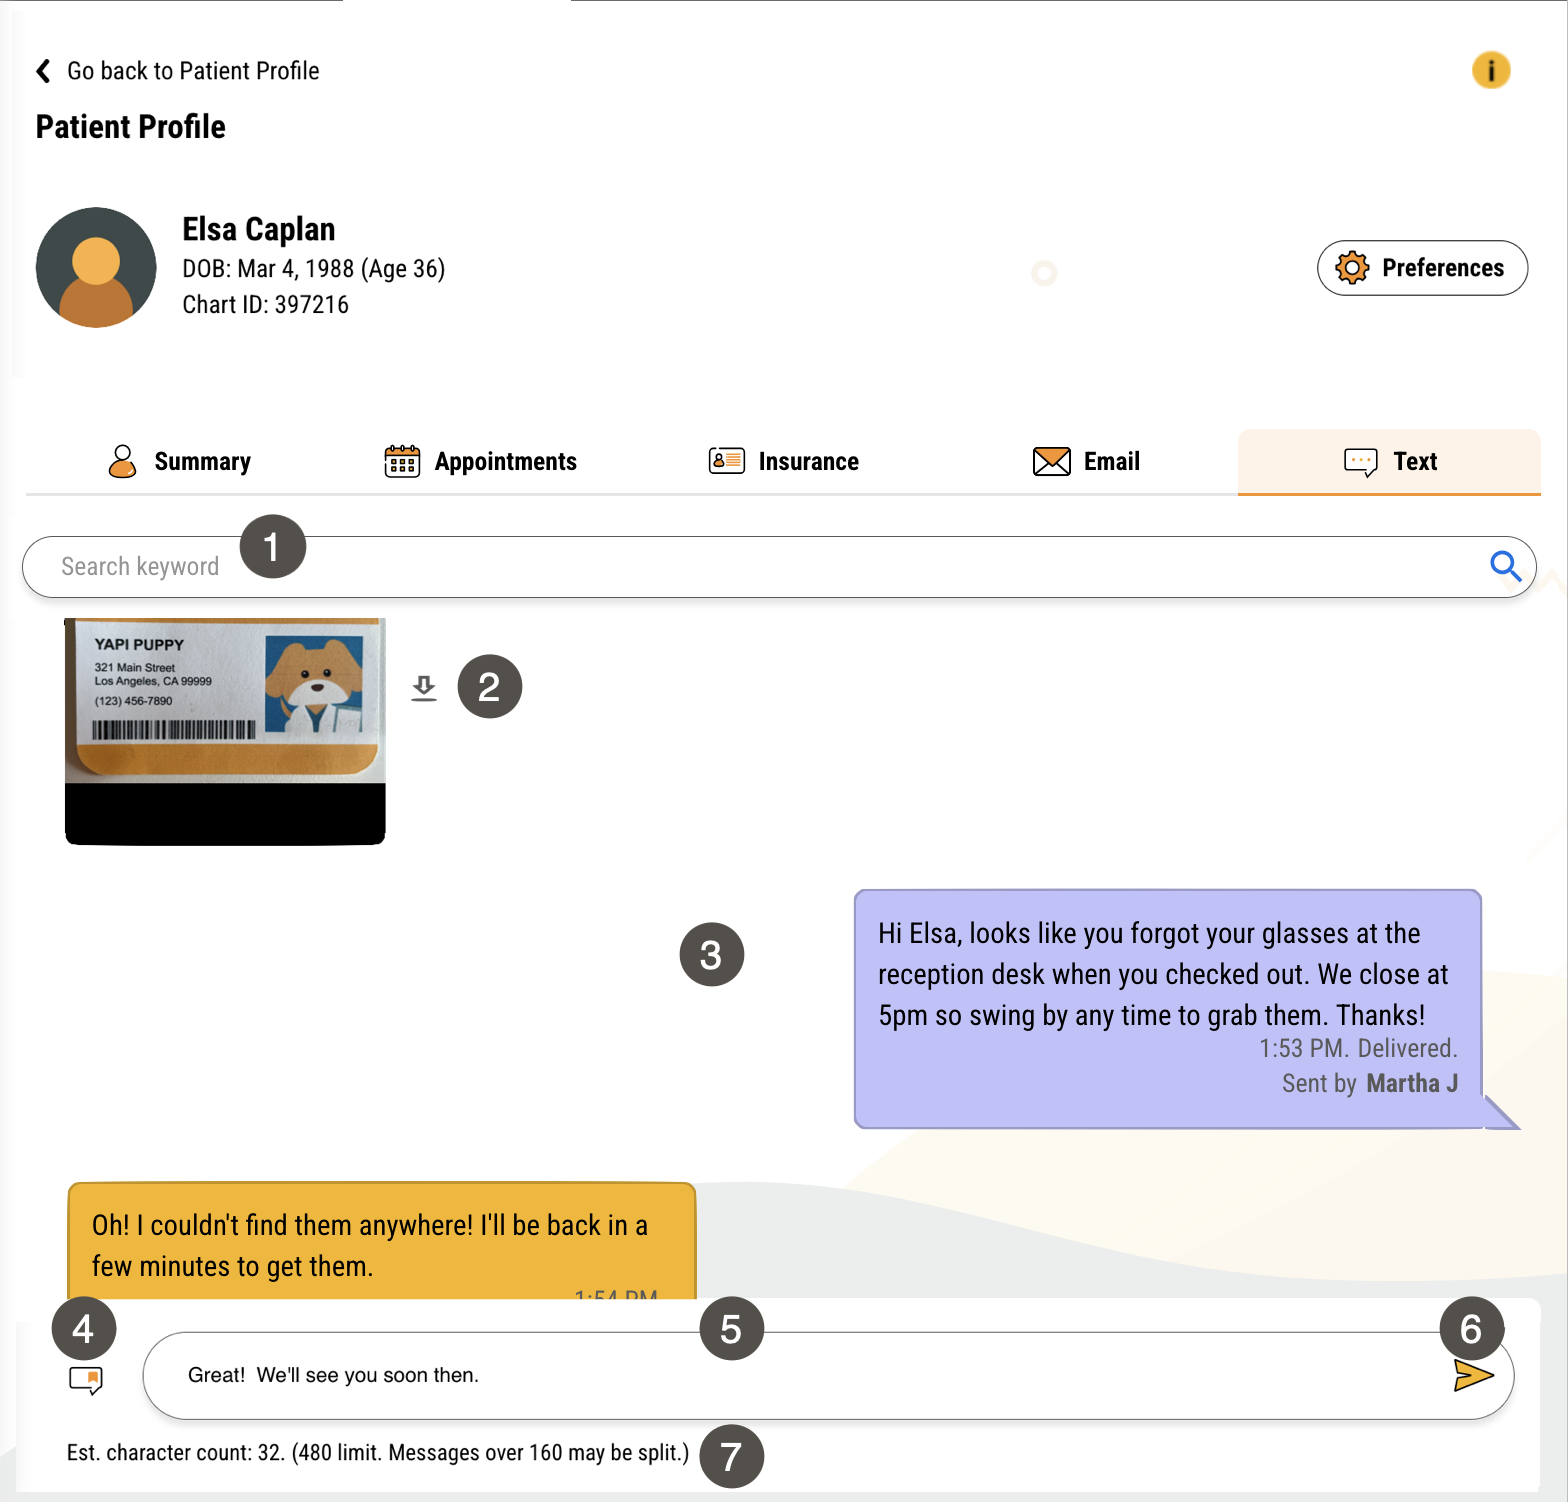
To get to the Text tab of a patient's Profile, search for them in the Patient Finder, click their name in your search results, and click Text.

Text_Tab_2-25.png

One.

Search Box

Search texts to and from a patient by keyword.

Two.

Image with Download Button

Within a patient's text messages, you can view images a patient texted you, click to preview them in another tab, and download them to your computer.

Three.

Text Messages

Text messages are displayed just like they are on your phone: texts from your practice are on the right and texts from the patient appear on the left. Texts from your patient always appear in orange; texts from your practice are color-coded by sender and show the sender's name.

You can also scroll up to view a 13-month history of texts with your patient through Leap including 1:1 texts, reminders, review requests, and Fill Appointments messages.

Four.

Insert Text Template

Click the Text Template icon to select any pre-made template created by the Admins on your team.

Five.

Text Box

Here, you can compose a text to your patient from scratch or if you chose a text template, that pre-made text will appear here.

Six.

Send Button

Sends the text currently in the Text Box to the mobile number your patient has on file.

Seven.

Character Count

Displays the amount of characters currently in the text box. We recommend keeping texts under 160 characters as some phone carriers split longer texts into multiple pieces.

To get to a patient's Preferences, search for them in the Patient Finder, click their name in your search results, and click the Preferences button.

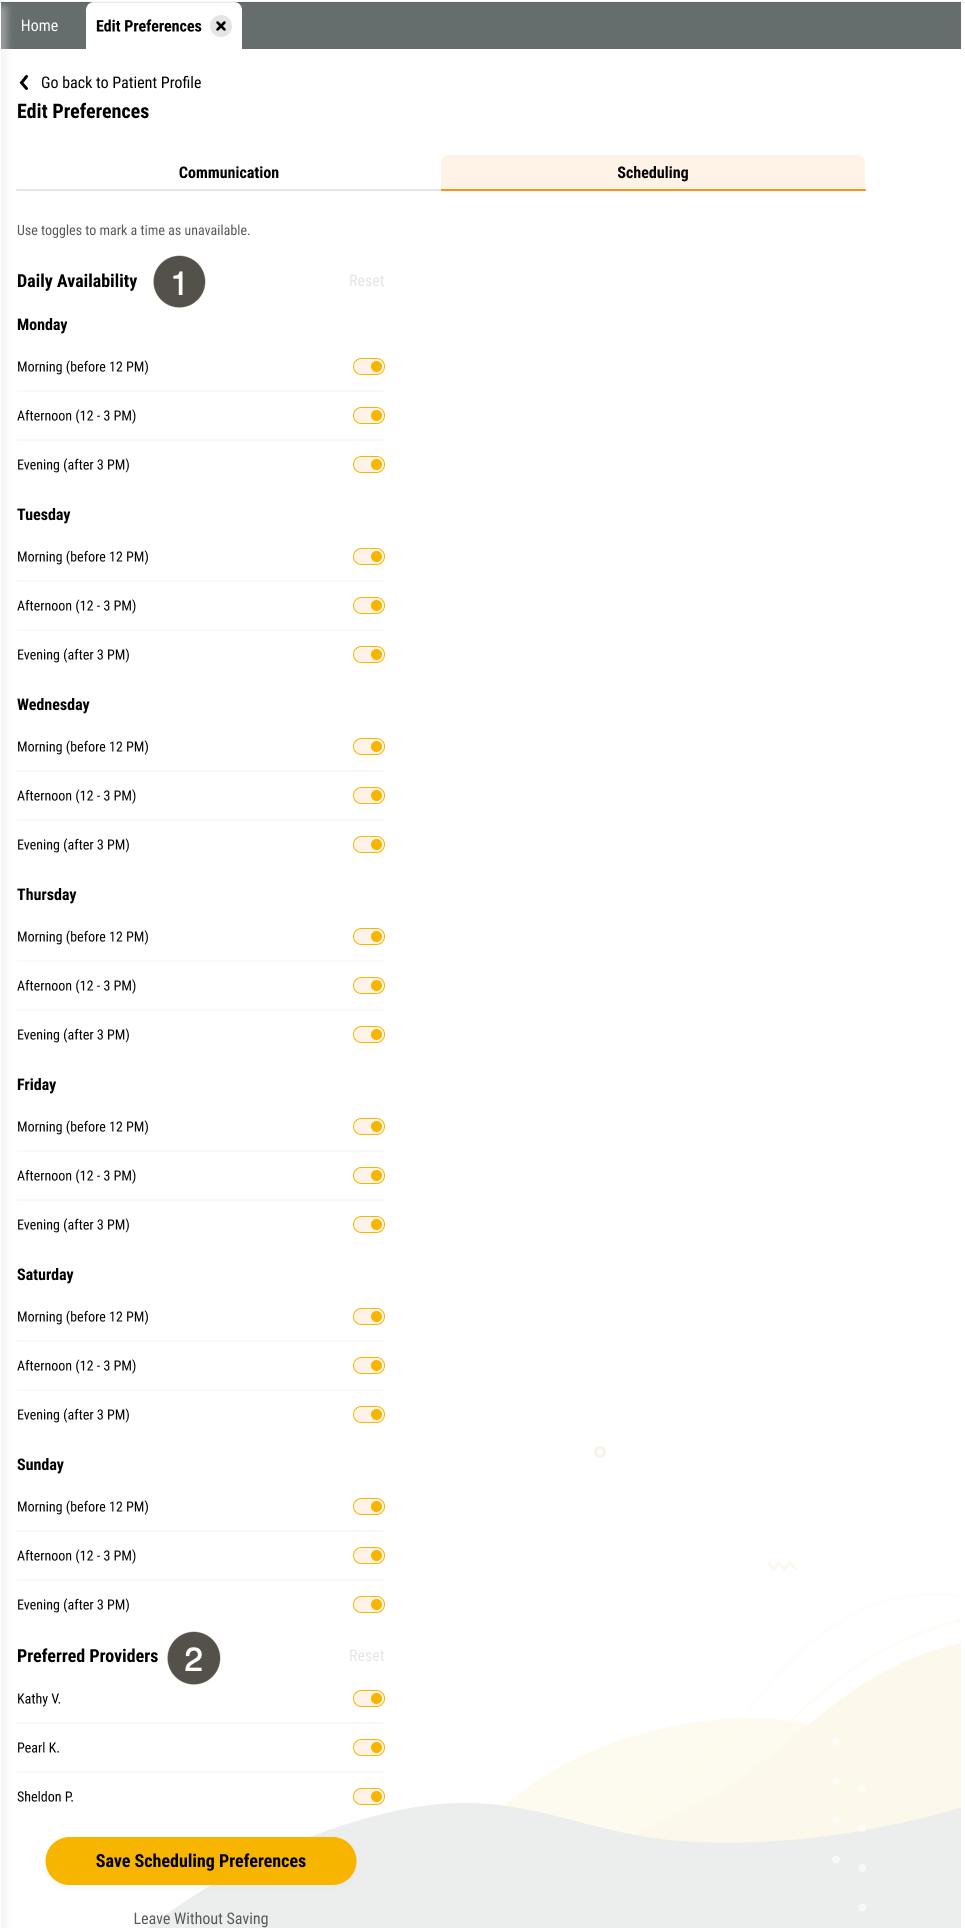
To get to a patient's scheduling preferences, search for them in the Patient Finder, click their name in your search results, and click the Preferences button. The Scheduling tab shows by default.

Scheduling tab of a patient's Edit Preferences page with two items labelled, described in the table to the right.

One.

Daily Availability

Displays a patient's availability preferences for morning, afternoon, and evening appointments each day of the week.

All enabled by default, you can edit a patient's availability by adjusting the toggles (right/orange for available, left/grey for unavailable).

Two.

Preferred Providers

Displays a patient's preferred providers at your practice. All providers are enabled by default but you can make adjustments as needed.

Note

Updating a patient's scheduling preferences only impacts Yapi Leap and doesn't save this information to Dentrix.

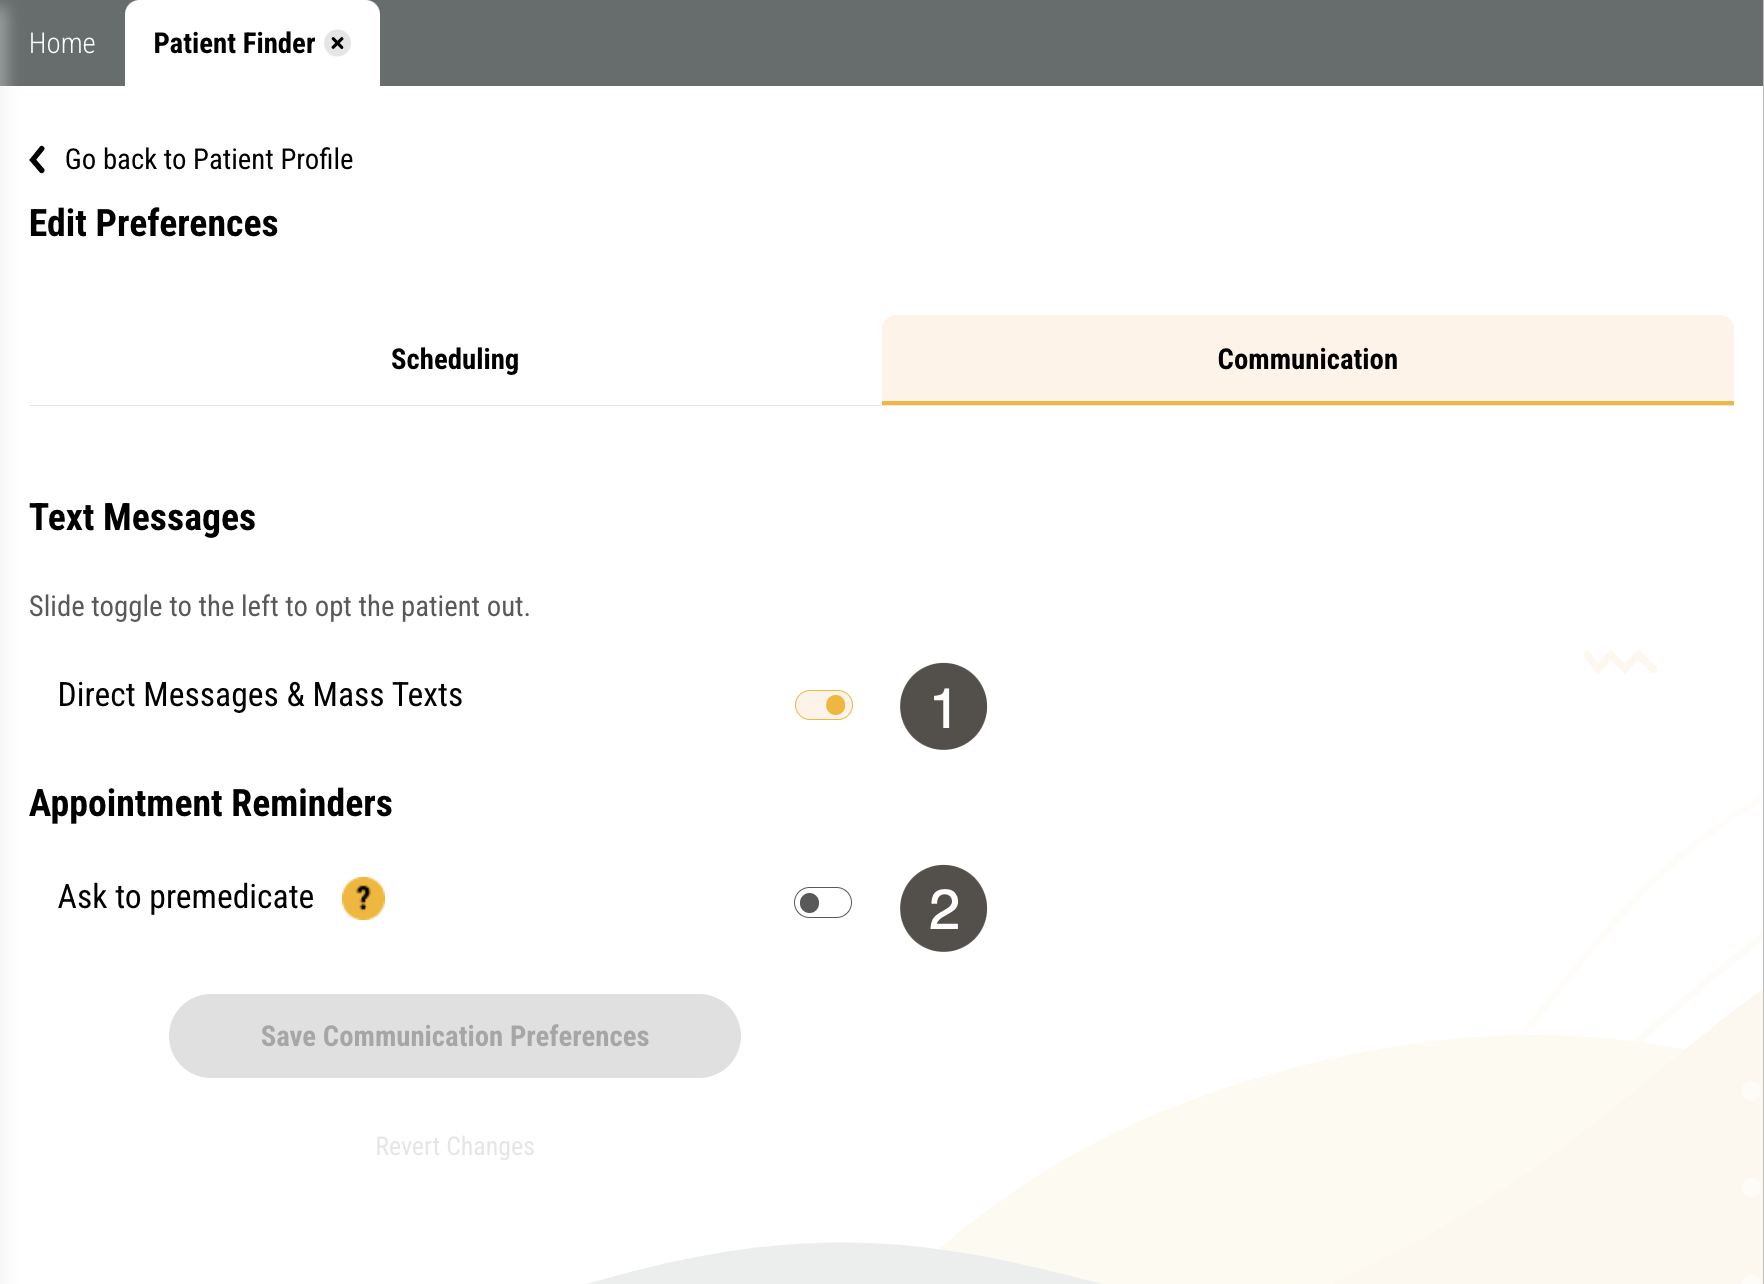
To get to a patient's communication preferences, search for them in the Patient Finder. Then click their name in your search > Preferences > Communication.

Communication tab of a patient's Edit Preferences page with two items labelled, described in the table to the right.

One.

Direct Messages & Mass Texts

Displays a patient's preference for receiving 1:1 texts and mass texts from your practice.

All texts are automatically enabled by default but you can opt a patient out of receiving these texts by moving the toggle to the left (grey). This doesn't affect automated texts like reminders or forms requests.

Two.

Ask to premedicate

Here, you can mark a patient as needing to premedicate before their appointment. If the Premedicate Text is enabled in your Leap appointment reminders, the patient will receive a text the day before their appointment reminding them to take their medication.

Important

This only edits a patient's communication preferences in Yapi Leap and doesn't update communication preferences in Dentrix or features outside of Leap like the Yapi Classic Dashboard and Yapi Classic appointment reminders.